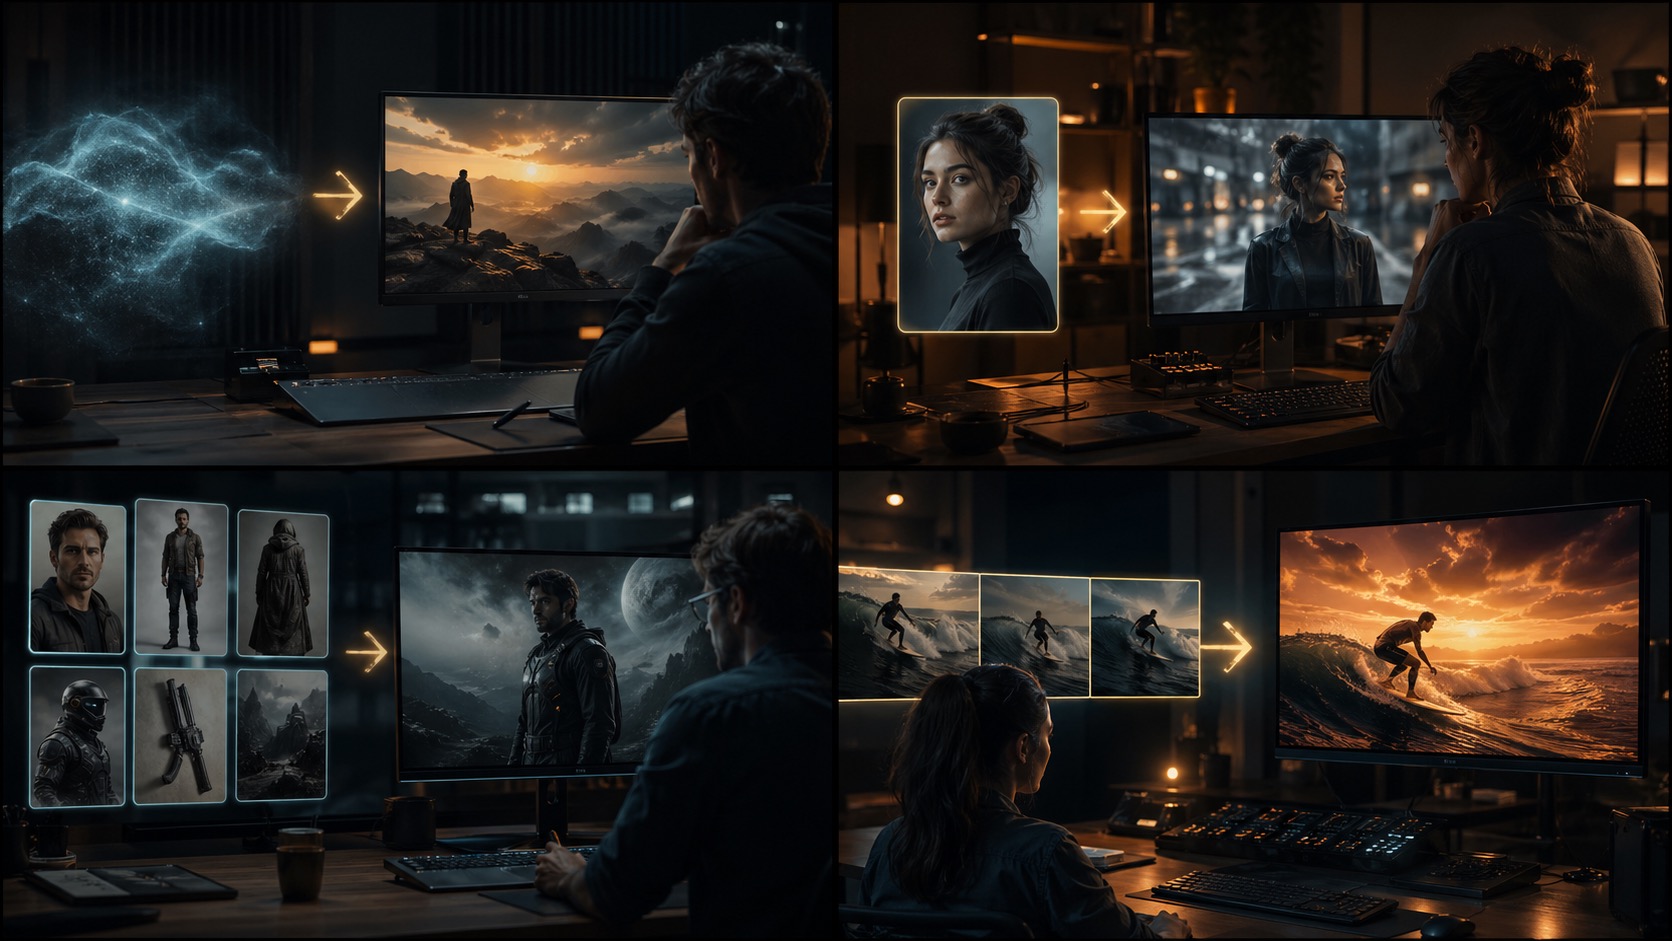
If you want the short answer first, the best way to use an AI video generator is to choose the right starting workflow before you touch the prompt box. Most people still think “AI video generator” means one single feature. In practice, the useful workflows are different: sometimes you should start from text, sometimes from an image, sometimes from reference images, and sometimes from an existing video you want to restyle.
On tryhappyhorseai.com, the live product now supports four practical workflows inside the same generator:
text-to-videoimage-to-videoreference-to-videovideo-edit
That matters because choosing the wrong mode creates most of the bad results people blame on the model. The problem is often not “AI video is bad.” The problem is “the workflow did not match the input.”
If you want to try the tool while reading, start here: AI video generator for creators.
The Quick Answer
Use these four modes like this:
| Mode | Start here when... | Best for |
|---|---|---|
| Text to Video | You only have an idea or prompt | Concept videos, scenes from scratch, ad concepts, mood tests |
| Image to Video | You already have a still image | Product motion, portrait animation, hero visuals, poster-to-video |
| Reference to Video | You need identity or style consistency | Character storytelling, multi-character scenes, repeatable visual direction |
| Video Edit | You already have a clip and want to change it | Restyling, local replacement, visual upgrades, edit passes |
The practical rule is simple:
- start with text-to-video when the scene does not exist yet
- start with image-to-video when the shot already exists as a still
- start with reference-to-video when consistency matters more than speed
- start with video-edit when you want to transform something you already rendered or recorded
Step 1: Pick the Right Workflow Before You Write Anything
This is the biggest mistake beginners make. They jump into the generator, write a long cinematic prompt, and hope the system will infer the right starting point for them.
That usually wastes time.
Before you generate anything, ask one question:
What do I already have?
If you only have an idea, use Text to Video
Use Text to Video when your starting point is:
- a scene idea
- a product concept
- a mood board in your head
- a social ad angle
- a short narrative beat
This is the most flexible workflow because you are creating the scene from scratch.
If you already have a frame, use Image to Video
Use Image to Video when you already have:
- a portrait
- a product shot
- a hero banner image
- concept art
- a poster frame
This workflow is usually more stable because the composition already exists.
If consistency matters, use Reference to Video
Use Reference to Video when you need:
- the same character across frames
- multiple characters with stable identity
- consistent visual styling
- a repeatable campaign look
- tighter control over scene identity
This is where many teams should switch before they keep retrying prompt-only runs.
If you already have a clip, use Video Edit
Use Video Edit when your starting point is:
- an existing render
- a previously generated clip
- a source video you want to restyle
- footage that needs a visual pass
- a clip where only part of the look needs to change
This is the right mode when the structure is already good and you want to change the appearance, not rebuild the whole shot.
Step 2: Build the Input That Matches the Mode
Once you pick the mode, the next job is not “write a better prompt.” The next job is “give the mode the kind of input it actually wants.”
Text to Video: Start With Subject, Motion, Camera, Mood
For text-to-video, the prompt is carrying most of the workload. The cleanest starting structure is:
- subject
- action or motion
- camera language
- lighting or mood
- environment
Example:
A luxury perfume bottle resting on black volcanic rock, slow cinematic camera orbit, ocean spray in the background, dramatic rim lighting, premium commercial look
This mode works best for:
- creative exploration
- short ad concepts
- scene ideation
- cinematic tests
Common mistake:
- writing abstract marketing language instead of visual instructions
Weak:
Create a premium ad for a beauty brand
Better:
A glass perfume bottle on reflective black stone, soft mist drifting around the base, slow orbit shot, cool moonlit lighting with warm highlights, premium luxury commercial style
Image to Video: Keep the Motion Small and Logical
For image-to-video, the image is already doing half the work. Your prompt should guide motion, not reinvent the shot.
This mode works especially well for:
- product images
- portraits
- campaign stills
- scene keyframes
Best input pattern:
- upload a strong still image
- add a short motion prompt only if needed
Good motion prompt:
Subtle push-in, gentle hair movement, natural blink, soft background drift
Bad motion prompt:
Turn this portrait into a fast action scene with explosions and dramatic camera flips
If the source image already feels finished, stay conservative. Image-to-video usually gets stronger when the motion grows naturally out of the frame.
If you want a deeper guide on this mode specifically, read Happy Horse AI Image to Video: Complete Guide with Examples.
Reference to Video: Use References for Identity, Not Decoration
Reference-to-video is where many advanced users finally get the control they wanted from prompt-only generation.
On this workflow, the goal is usually:
- keep a character consistent
- keep multiple characters recognizable
- preserve a product or brand look
- maintain style across multiple outputs
The working pattern is:
- upload the reference images
- write the prompt using
character1,character2, and so on - describe the scene, motion, and camera around those references
Example:
character1 walks through a rainy neon market at night, character2 follows a few steps behind, handheld cinematic tracking shot, wet street reflections, subtle crowd motion
This mode is stronger than text-to-video when your real problem is consistency rather than imagination.
Video Edit: Change the Look, Preserve the Structure
Video-edit is the right choice when you do not want to rebuild the timing, framing, or shot logic from zero.
Good use cases:
- apply a new visual style
- restyle a clip for a new campaign mood
- replace part of the look
- make an existing shot feel more cinematic
Good instruction pattern:
Restyle the scene with warmer golden-hour lighting, stronger contrast, shallow depth-of-field feel, and a premium commercial finish while preserving the original subject motion
Bad instruction pattern:
Make it better
The more clearly you say what to preserve and what to change, the more usable this mode becomes.
Step 3: Use the Full 4-Mode Workflow the Way Real Teams Do
Most good outputs do not come from one perfect generation. They come from choosing the right sequence.
A practical production flow looks like this:
Workflow A: From concept to finished ad
- Start in
text-to-videoto explore scene directions - Keep the best frame or variation
- Switch to
image-to-videoif you want a more controlled version of a chosen still - Use
video-editto restyle the final clip if needed
Workflow B: From character board to story scene
- Upload reference images in
reference-to-video - Generate the consistent character shot
- If one clip is close but not polished, send it through
video-edit
Workflow C: From product still to social promo
- Start with
image-to-video - Animate the still with restrained motion
- If the first pass feels too plain, refine with a tighter motion prompt or a visual edit pass
The point is not to force everything through one mode. The point is to use each mode for the job it is good at.
Common Mistakes and How to Fix Them
Mistake 1: Using text-to-video when you already have a perfect still
Fix:
- switch to image-to-video instead of rewriting the prompt 20 times
Mistake 2: Using image-to-video for a scene that needs identity consistency across many shots
Fix:
- move to reference-to-video and upload the actual references
Mistake 3: Using video-edit when the original shot structure is wrong
Fix:
- go back and regenerate the base shot first
Mistake 4: Writing “marketing copy” instead of visual instructions
Fix:
- describe subject, motion, camera, lighting, and environment
Mistake 5: Asking for too much motion from a static image
Fix:
- reduce the motion request and keep it physically plausible
Which Workflow Should You Start With?
Use this shortcut:
| If your starting asset is... | Start here |
|---|---|
| only a written idea | Text to Video |
| a still image | Image to Video |
| reference images you need to keep consistent | Reference to Video |
| an existing clip | Video Edit |
If you are still unsure, start from the safest practical question:
Am I creating a scene, animating a scene, controlling a scene, or changing a scene?
- creating = text-to-video
- animating = image-to-video
- controlling = reference-to-video
- changing = video-edit
Our Recommendation
If you are new to AI video generation, start with text-to-video or image-to-video first.
If you are struggling with consistency, do not keep brute-forcing prompt-only generation. Move to reference-to-video.
If your clip already works and only the look needs to change, stop regenerating from scratch and use video-edit.
That is the most practical way to use an AI video generator in 2026: pick the workflow that matches the asset you already have, then iterate inside the right mode instead of fighting the wrong one.
If you want to try all four workflows in one place, go to the live AI video generator with all four workflows.
FAQ
What is the best way to use an AI video generator?
Start by choosing the right workflow. Use text-to-video for new ideas, image-to-video for existing stills, reference-to-video for consistency, and video-edit for changing an existing clip.
What is the difference between text-to-video and image-to-video?
Text-to-video creates a scene from a written prompt. Image-to-video starts from a still image and adds motion to it. If the composition already exists, image-to-video is usually the better starting point.
When should I use reference-to-video?
Use it when identity consistency matters, especially for recurring characters, multi-character scenes, or stable visual direction across outputs.
When should I use video-edit instead of generating again?
Use video-edit when the original shot structure is already good and you only want to change the look, style, or part of the visual treatment.
Is image-to-video better for product videos?
Usually, yes. If you already have a strong product image, image-to-video is often the fastest and most stable way to create controlled motion.
What is the biggest mistake beginners make with AI video generators?
They choose the wrong starting mode. Many bad results come from forcing a prompt-only workflow onto a task that really needed an image, reference set, or edit pass.
Recommended Reading
- AI Video Generator for Text, Image, Reference, and Video Edit
- Happy Horse AI Image to Video: Complete Guide with Examples
- 50 Happy Horse AI Prompts That Actually Work
- Best AI Video Generators in 2026: Full Ranking for Creators